Experiencing issues with your Oculus (Meta) Quest controllers can be incredibly frustrating, disrupting your VR immersion and making it impossible to navigate virtual worlds. From unresponsive buttons to complete connection failures, there are various reasons why your controllers might not be functioning correctly. This guide provides a comprehensive, step-by-step approach to diagnosing and resolving the most common Oculus controller problems.
Before you consider replacing your controllers, it's crucial to systematically troubleshoot the issue. We'll cover everything from basic battery checks to more advanced troubleshooting techniques, ensuring you exhaust all possible solutions. Remember to follow each step carefully and in the order presented for the best results. By the end of this guide, you'll be well-equipped to get your controllers back in action and return to enjoying your VR experience.
Let's dive in and get those controllers working again!
Step 1: Basic Battery Check and Replacement
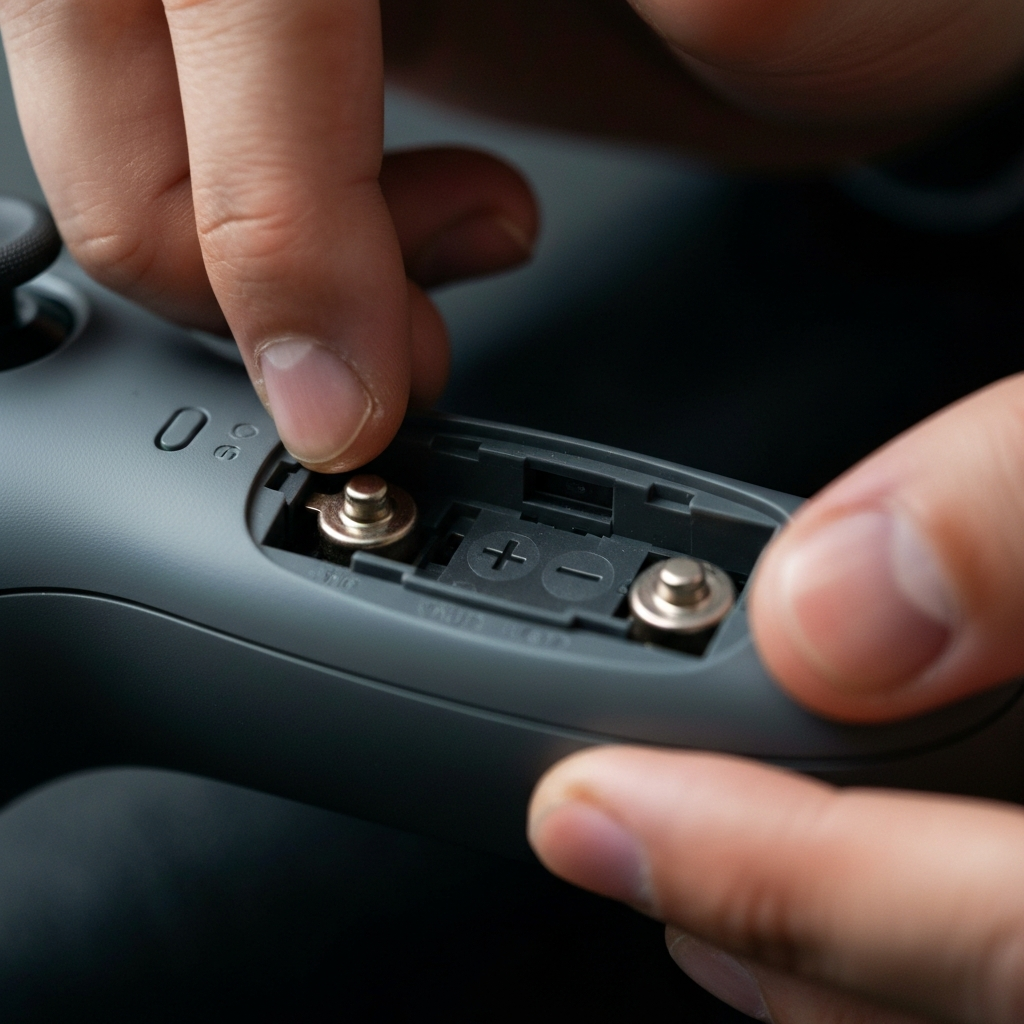
Checking and Replacing Controller Batteries
The most common culprit behind a non-functional Oculus controller is simply dead or low batteries. Ensure that the batteries are correctly inserted, paying close attention to the positive (+) and negative (-) markings inside the battery compartment. Even if the controllers seem to power on briefly, low batteries can cause intermittent connection issues and tracking problems. Always use high-quality AA batteries with a voltage of 1.5V for optimal performance. Some rechargeable batteries may have a lower voltage, leading to tracking inaccuracies or failure. Replace the batteries with a fresh set, even if the existing ones are relatively new, to eliminate this possibility.
Step 2: Restarting the Headset and Controllers
Performing a System Restart
Sometimes, a simple system restart can resolve temporary glitches that prevent your controllers from connecting or functioning properly. To restart your Oculus headset, press and hold the power button on the side of the headset until the power menu appears. Select the "Restart" option and allow the system to reboot. Once the headset has fully restarted, try using your controllers again. If the issue persists, you can also try power cycling the controllers, which involves removing the batteries for an extended period (around 15 minutes) before reinserting them. This allows the controller's firmware to fully reset. Make sure the headset is powered off during this controller reset.

Step 3: Cleaning the Tracking Cameras
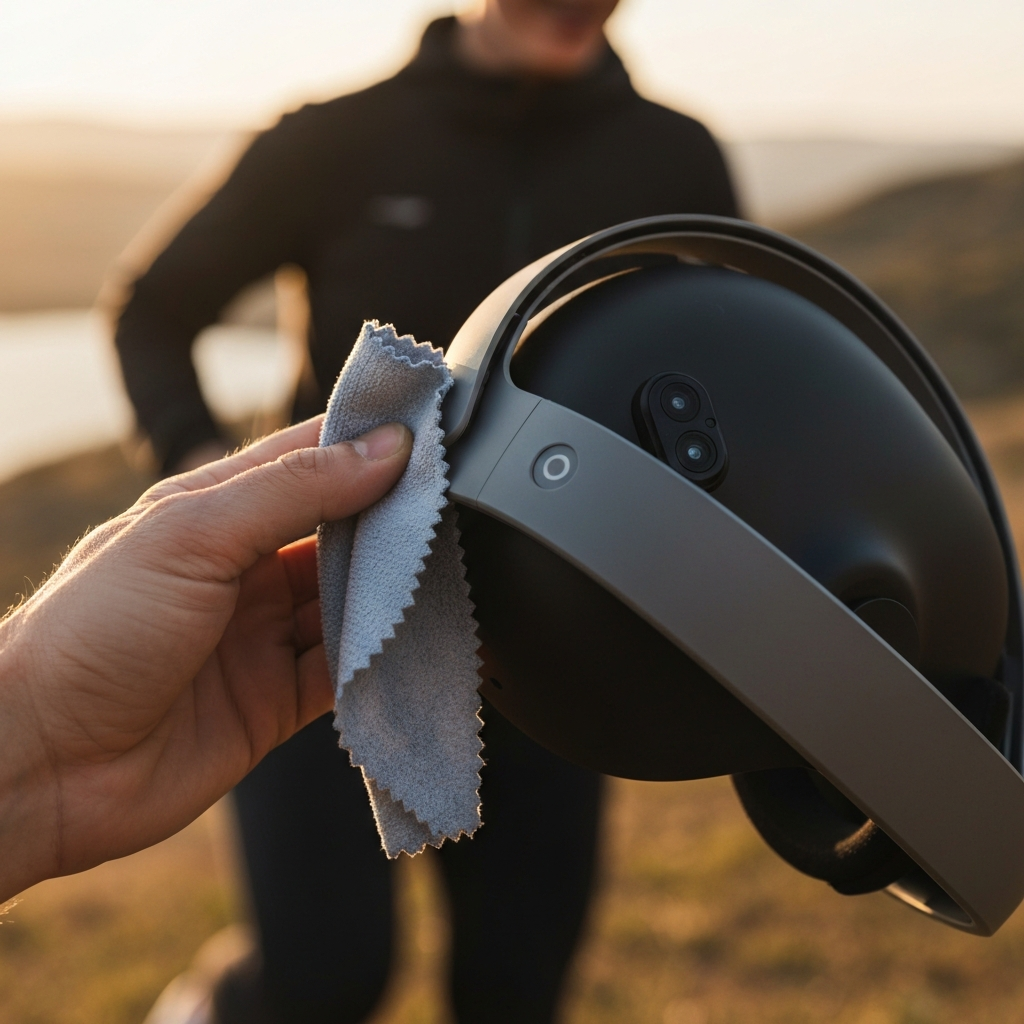
Ensuring Clear Camera Visibility
The Oculus Quest relies on external tracking cameras to monitor the position of your controllers. Dirty or obstructed cameras can significantly impact tracking accuracy and even prevent the controllers from being recognized. Use a clean, dry microfiber cloth to gently wipe the tracking cameras located on the front of the headset. Avoid using any liquids or abrasive cleaners, as these can damage the lenses. Pay attention to removing any dust, fingerprints, or smudges. If you notice persistent drift or erratic controller movement, cleaning the cameras should be one of your first steps.
Step 4: Checking Your Surroundings for Interference
Addressing Environmental Factors
Your environment can inadvertently interfere with the Oculus Quest's tracking capabilities. Reflective surfaces, such as mirrors, glass tables, and shiny decorations, can confuse the tracking cameras and cause controller issues. Temporarily remove or cover any reflective objects in your play area to see if this resolves the problem. Inadequate lighting can also affect tracking performance. Ensure that your room is well-lit with a steady light source. Avoid using flickering lights or holiday lights, as these can disrupt the tracking system. Also, be sure the room isn't TOO bright and causing excessive glare on the headset's sensors.

Step 5: Re-pairing Your Controllers
Establishing a Fresh Connection
If you've exhausted the basic troubleshooting steps and your controllers are still not working, try re-pairing them to your headset. This process establishes a new connection between the controllers and the headset, which can resolve software-related pairing issues. Open the Meta Quest mobile app on your smartphone or tablet. Navigate to "Menu" > "Devices" and select your headset. Tap each controller individually and select "Unpair." Once both controllers are unpaired, go back to the "Devices" menu, tap "Controllers," and then select "Pair New Controller." Follow the on-screen instructions to pair each controller. Remember to hold down the correct button combinations (B + System for the left controller, Y + System for the right controller) until the LED light on the controller blinks. The light will stop blinking when the pairing is complete.

Step 6: Updating Controllers and Headset
Ensuring Software Compatibility
Outdated software on your headset or controllers can sometimes lead to compatibility issues and controller malfunctions. Make sure your Oculus Quest and controllers are running the latest software versions. To update from the headset: Press the Oculus button, then go to Settings > About > Install Updates. To update using the mobile app: Go to Settings > Your Headset > More Settings > Advanced Settings > Updates > Update. The update process may take some time, so be patient. A stable Wi-Fi connection is crucial for a successful update. After the update is complete, restart both the headset and controllers.
Step 7: Adjusting Tracking Frequency
Optimizing for Your Region's Lighting
The tracking frequency of your Oculus Quest can sometimes cause issues, particularly if it's not aligned with the frequency of your region's power grid. In some regions, household lights flicker at 50Hz, which can interfere with the default tracking frequency of 60Hz. To adjust the tracking frequency, open the Meta mobile app, tap "Devices," and select your headset. Tap "Advanced Settings" > "Tracking Frequency" and choose a frequency that is appropriate for your region (50Hz or 60Hz) or try using the "Auto" function. Experiment with different frequencies to see if it improves controller tracking and responsiveness.

Step 8: Factory Reset (Use as Last Resort)
Restoring Default Settings
As a last resort, you can try performing a factory reset on your Oculus Quest. This will erase all your data and settings, so only use this option if all other troubleshooting steps have failed. To perform a factory reset, turn off your Oculus Quest. Then, press and hold the "Power" and "Volume Down" buttons simultaneously. Use the "Volume Down" button to navigate to "Factory Reset" and press the "Power" button to select it. Press the "Power" button again to confirm the action. The Oculus Quest will then reset to its factory settings. After the reset is complete, you will need to set up your Oculus Quest again from scratch. Remember to re-pair your controllers after the factory reset.

FAQ Section
Q: My controller vibrates constantly. Is this normal?
A: Constant vibration usually indicates low battery power. Try replacing the batteries with a fresh set.
Q: The controller light is blinking, but it's still not working. What should I do?
A: This often indicates a pairing issue. Try re-pairing the controller to your headset following the steps outlined above.
Q: I dropped my controller, and now it's not working. Is it broken?
A: It's possible that dropping the controller has damaged its internal components. Contact Meta support for assistance.
Conclusion
Troubleshooting Oculus controller issues can seem daunting, but by systematically following the steps outlined in this guide, you should be able to resolve most common problems. Remember to start with the basics, such as checking the batteries and cleaning the tracking cameras, before moving on to more advanced troubleshooting techniques like re-pairing and factory resetting. If you've tried all the solutions outlined here and your controllers are still not working, it's best to contact Meta support for further assistance. With a little patience and perseverance, you'll be back in the virtual world in no time!