Working with thick plastic can be a challenging but rewarding experience. Whether you're crafting custom parts, modifying existing structures, or undertaking DIY projects, knowing how to properly cut thick plastic is essential. Unlike thinner materials, thick plastics require specific techniques and tools to achieve clean, precise cuts without cracking or melting.
This guide provides a step-by-step approach to cutting thick plastic, covering various methods and tools suitable for different types of plastic and project requirements. We'll delve into the importance of selecting the right blade, controlling heat build-up, and ensuring safety throughout the cutting process. By following these instructions, you'll be able to confidently and efficiently cut thick plastic for any application.
From choosing the appropriate saw to mastering the art of scoring and snapping, we'll equip you with the knowledge and skills needed to tackle even the most demanding plastic cutting tasks. Let's get started!
Step 1: Choosing the Right Tool
Selecting the right tool is the first crucial step in cutting thick plastic effectively. The best option depends on the type of plastic, the thickness, and the desired precision of the cut. A fine-toothed saw, jigsaw, or table saw with a non-melt blade are generally the most suitable choices. Fine-toothed saws are ideal for precise cuts and delicate work, while jigsaws excel at cutting curves and irregular shapes. Table saws, when equipped with a specialized non-melt blade designed for plastics, offer speed and efficiency for straight cuts on thicker materials. Consider the specific requirements of your project to determine the optimal tool for the job.

Step 2: Securing the Plastic
Properly securing the plastic workpiece is paramount for safety and accuracy. Regardless of the cutting method, the plastic must be firmly held in place to prevent movement or vibration during the cutting process. Use clamps, vises, or a workbench with integrated clamping systems to secure the plastic. Ensure that the clamping pressure is sufficient to hold the plastic securely without causing damage or distortion. For larger pieces, consider using multiple clamps to distribute the pressure evenly. This step is crucial for achieving clean, straight cuts and minimizing the risk of accidents.

Step 3: Making the Cut with a Fine-Toothed Saw
If you've opted for a fine-toothed saw, begin by marking the cutting line clearly on the plastic surface. Use a ruler or straight edge and a fine-tipped marker for accuracy. When sawing, use the full length of the blade and apply smooth, even pressure. Avoid excessive force, as this can cause the plastic to chip or crack. Move the saw in a consistent back-and-forth motion, keeping the blade aligned with the marked cutting line. For thicker plastics, it may be helpful to make multiple passes, gradually increasing the depth of the cut with each pass. Jacob Pischer, a home improvement specialist, notes that saws designed for wood have teeth that are too large and will rip the plastic to shreds.

Step 4: Cutting with a Jigsaw
When using a jigsaw, it's essential to select a blade designed for cutting plastics. These blades typically have finer teeth and are less prone to melting or chipping the plastic. Before starting the cut, ensure the jigsaw's base plate is flush against the plastic surface. Squeeze the trigger and allow the blade to reach full speed before making contact with the plastic. Guide the jigsaw along the marked cutting line with a steady hand, applying gentle pressure. Avoid forcing the saw, as this can cause the blade to bind or wander. Jigsaws are particularly useful for cutting curves and intricate shapes in thick plastic.

Step 5: Using a Table Saw with a Non-Melt Blade
A table saw can efficiently cut thick plastic, but it requires a specialized non-melt blade. These blades have a unique tooth geometry and are designed to minimize heat buildup during the cutting process. Before starting the saw, make sure that your safety glasses are on. Start the table saw and allow it to reach full speed. Slowly and steadily push the plastic forward until it engages the blade. Continue to push the plastic through the blade in a smooth, controlled motion, maintaining a consistent feed rate. Avoid stopping or hesitating mid-cut, as this can cause the plastic to melt or bind. Always use push sticks or other safety devices to keep your hands away from the blade.

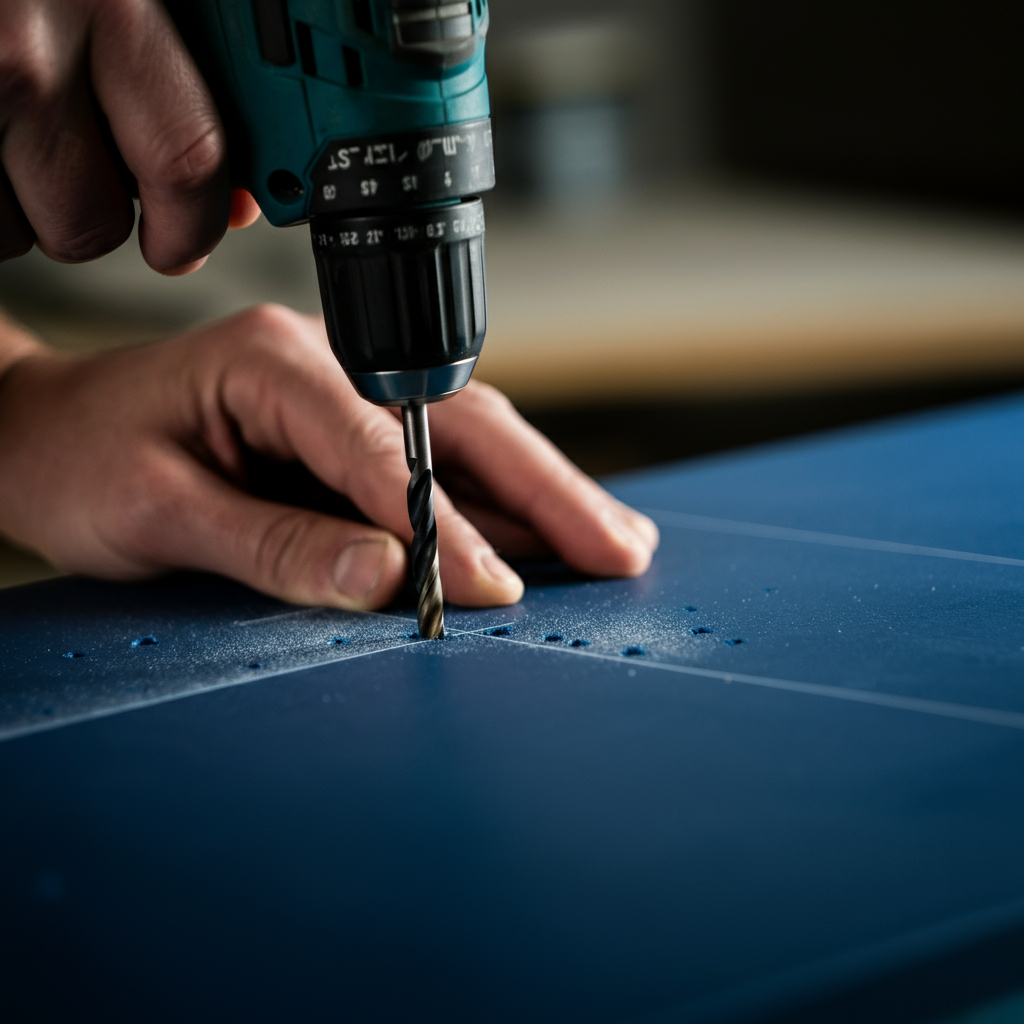
Step 6: Drilling Holes to Facilitate Cutting
Sometimes cutting straight through thick plastic is difficult even with the right saw. Drilling a series of small, closely spaced holes along the intended cutting line can significantly weaken the plastic and make it easier to cut. Select a small drill bit (no larger than 1/8 inch in diameter) and drill 6-10 holes. After drilling the holes, use a hobby knife to cut the remaining material between the holes. Utility knives are also often called hobby knives and can be purchased at any craft or hobby supply store.
Step 7: Slicing with String
For intricate or delicate cuts, slicing through plastic with a string can be an effective technique. Test the durability of the string by jerking your hands outward with medium force while holding the string. If it flexes slightly and doesn't snap, it'll cut through the plastic. Clamp the plastic firmly between your knees. Work the thread back and forth to start a small incision. Replace the string if it gets hot or frayed.

Tools or Materials Required
- Fine-toothed saw, jigsaw, or table saw with a non-melt blade
- Clamps or vise
- Safety glasses
- Hearing protection (when using power tools)
- Fine-tipped marker
- Ruler or straight edge
- Drill with small drill bits (optional)
- Hobby knife (optional)
- String (optional)
Safety Considerations
- Always wear safety glasses to protect your eyes from flying debris.
- Use hearing protection when operating power tools like table saws and jigsaws.
- Ensure adequate ventilation to avoid inhaling plastic fumes.
- Keep your hands away from the blade at all times.
- Use push sticks or other safety devices when operating a table saw.
- Never force the saw or blade.
Common Mistakes to Avoid
- Using the wrong type of blade for plastic.
- Failing to secure the plastic properly.
- Applying too much pressure, causing the plastic to crack or chip.
- Cutting too quickly, leading to heat buildup and melting.
- Neglecting safety precautions.
Pro Tips
- When using a table saw, consider using a zero-clearance insert to minimize chipping and improve cut quality.
- For particularly thick plastics, try cooling the blade with compressed air to reduce heat buildup.
- Practice on scrap pieces of plastic to get a feel for the cutting process before working on your final project.
- Use a deburring tool or fine sandpaper to smooth out any rough edges after cutting.
FAQ Section
What is the best way to cut plastic containers?
The best tool is a saw, with fine-toothed, jigsaw, and table saw options all being viable.
How do I cut plastic without cracking it?
The best way to avoid cracking is drilling small holes then slicing through the plastic.
Will a hot knife cut through hard plastic?
While technically possible, it is not safe because of burn risks and fire risks.
Conclusion
Cutting thick plastic effectively requires a combination of the right tools, proper techniques, and a strong emphasis on safety. By carefully selecting the appropriate saw, securing the workpiece, and following the step-by-step instructions outlined in this guide, you can achieve clean, precise cuts without damaging the plastic. Remember to prioritize safety by wearing protective gear and taking precautions to prevent accidents. With practice and patience, you'll master the art of cutting thick plastic and confidently tackle any project that comes your way.